Online documentation

Qrivo Android Product Guide

Native Android QR app

Everything you need in one clear place

This online documentation site covers installation, architecture, branding, localization, monetization and release steps for Qrivo. It is designed for non-expert buyers who need a simple path from first open to Play Store release.
Overview

Overview reference image

Qrivo is a native Android QR scanner and generator built with Kotlin, Jetpack Compose, Material 3, Hilt, Room and DataStore. It includes scanning, generating, history, favorites, settings, localization and monetization support through AdMob and a one-time Google Play Billing purchase for Remove Ads.

Main stack

  • Kotlin
  • Jetpack Compose
  • Material 3
  • Navigation Compose
  • Hilt
  • Coroutines and Flow
  • Room
  • DataStore

Product areas

  • Scan QR and barcodes
  • Generate QR codes
  • Save history and favorites
  • Export PNG and share
  • Theme and language settings
  • About, Privacy and Support
  • AdMob support
  • Remove Ads purchase

Architecture

The project follows a practical clean structure that is easy to maintain and easy to reskin.

app/src/main/java/com/madcat/smartsuite/
  config/
  core/
  data/
  domain/
  features/
    about/
    app/
    favorites/
    generator/
    history/
    home/
    onboarding/
    premium/
    scanner/
    settings/
  navigation/
  ui/

Config

Centralized branding, theme, Home content, onboarding, ads and billing.

Data

Room, DataStore and repositories that keep persistence away from UI.

Features

Screen-level UI and ViewModels grouped by function for easier long-term maintenance.
Installation

Installation reference image

Requirements

  • Android Studio Iguana or newer
  • JDK 17
  • Android SDK installed
  • Windows, macOS or Linux environment that supports Android Studio

First open

  1. Open Android Studio.
  2. Choose Open.
  3. Select the project folder.
  4. Let Gradle sync.

First build

gradlew.bat assembleDebug

Debug APK output:

app/build/outputs/apk/debug/app-debug.apk
Reskin Guide (Summary)

Reskin image

Use this order for the fastest reskin process:

  1. Change the app name and support data.
  2. Replace icon, logo and splash assets.
  3. Change colors in the theme config.
  4. Edit Home and onboarding content.
  5. Edit About, Privacy and Support text.
  6. Configure AdMob and Billing if needed.
Recommended files: brand_strings.xml, ThemeConfig.kt, HomeContentConfig.kt, OnboardingConfig.kt, AdsConfig.kt, BillingConfig.kt

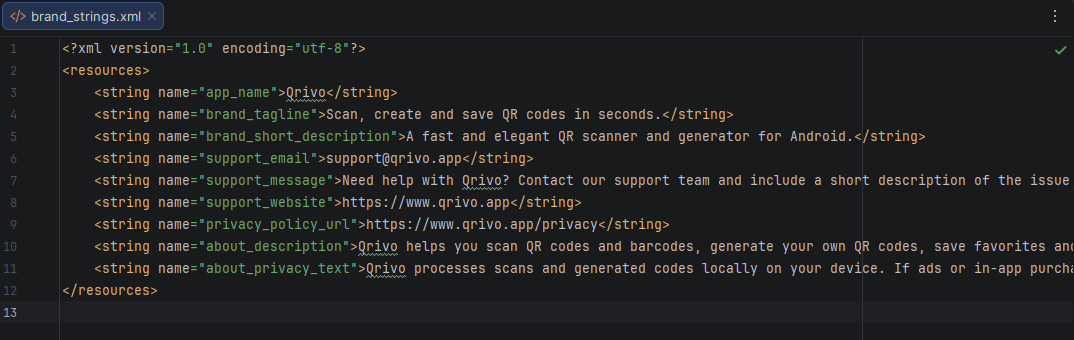
Change App Name

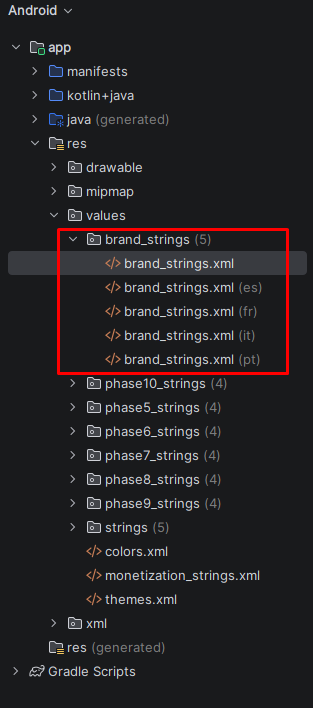
Edit the base visible name in:

app/src/main/res/values/brand_strings.xml

You need to edit strings on every language.
Reference 1
App name step 1 preview image

Main keys:

  • app_name
  • brand_tagline
  • brand_short_description
  • about_description

The app name is exposed through centralized config in AppConfig.kt and BrandingConfig.kt.
reference 2
App name step 2 preview image

Change Package Name

Current package name:

com.yourdevname.smartsuite
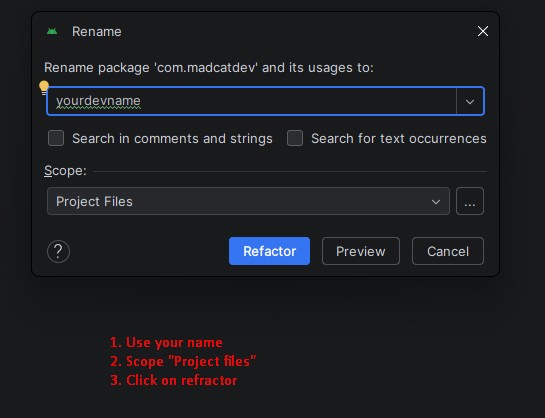
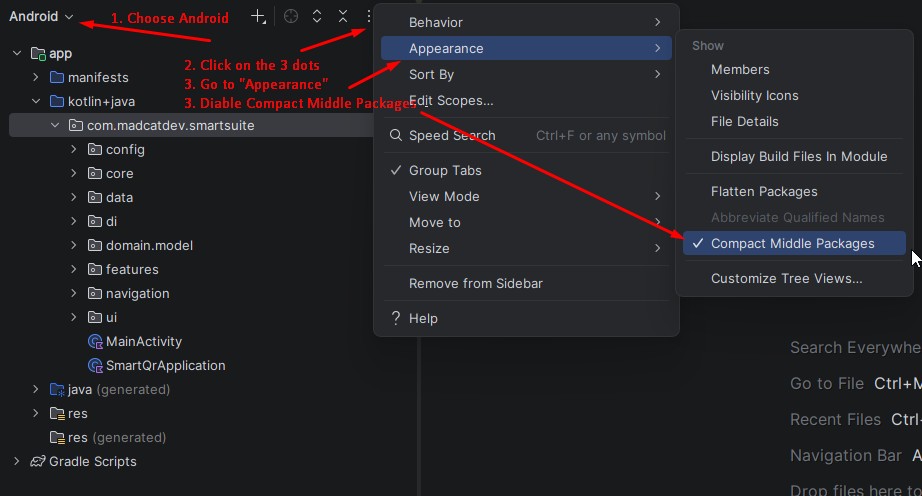
  1. Disable "Compact Middle Packages": In the Project pane, click the Gear icon and uncheck Compact Empty Middle Packages. This breaks the package name (e.g., com.example.app) into individual folders.
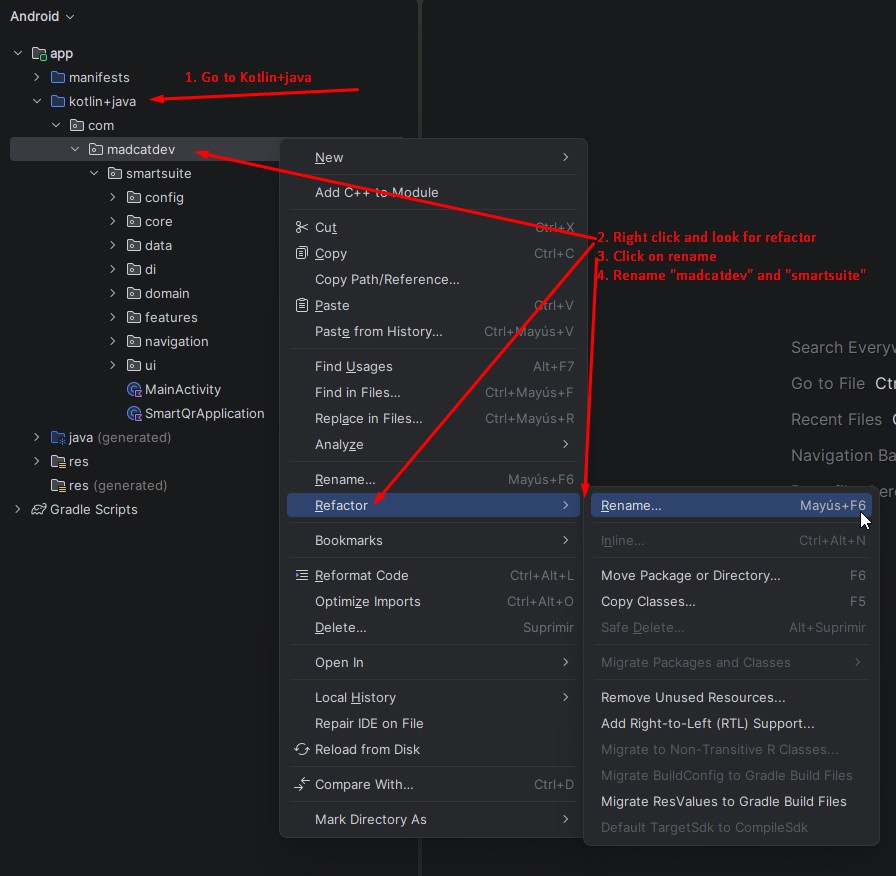
  2. Use Android Studio Refactor > Rename on the Java package.
Package name reference images
Package name step 1 reference image
1 First step
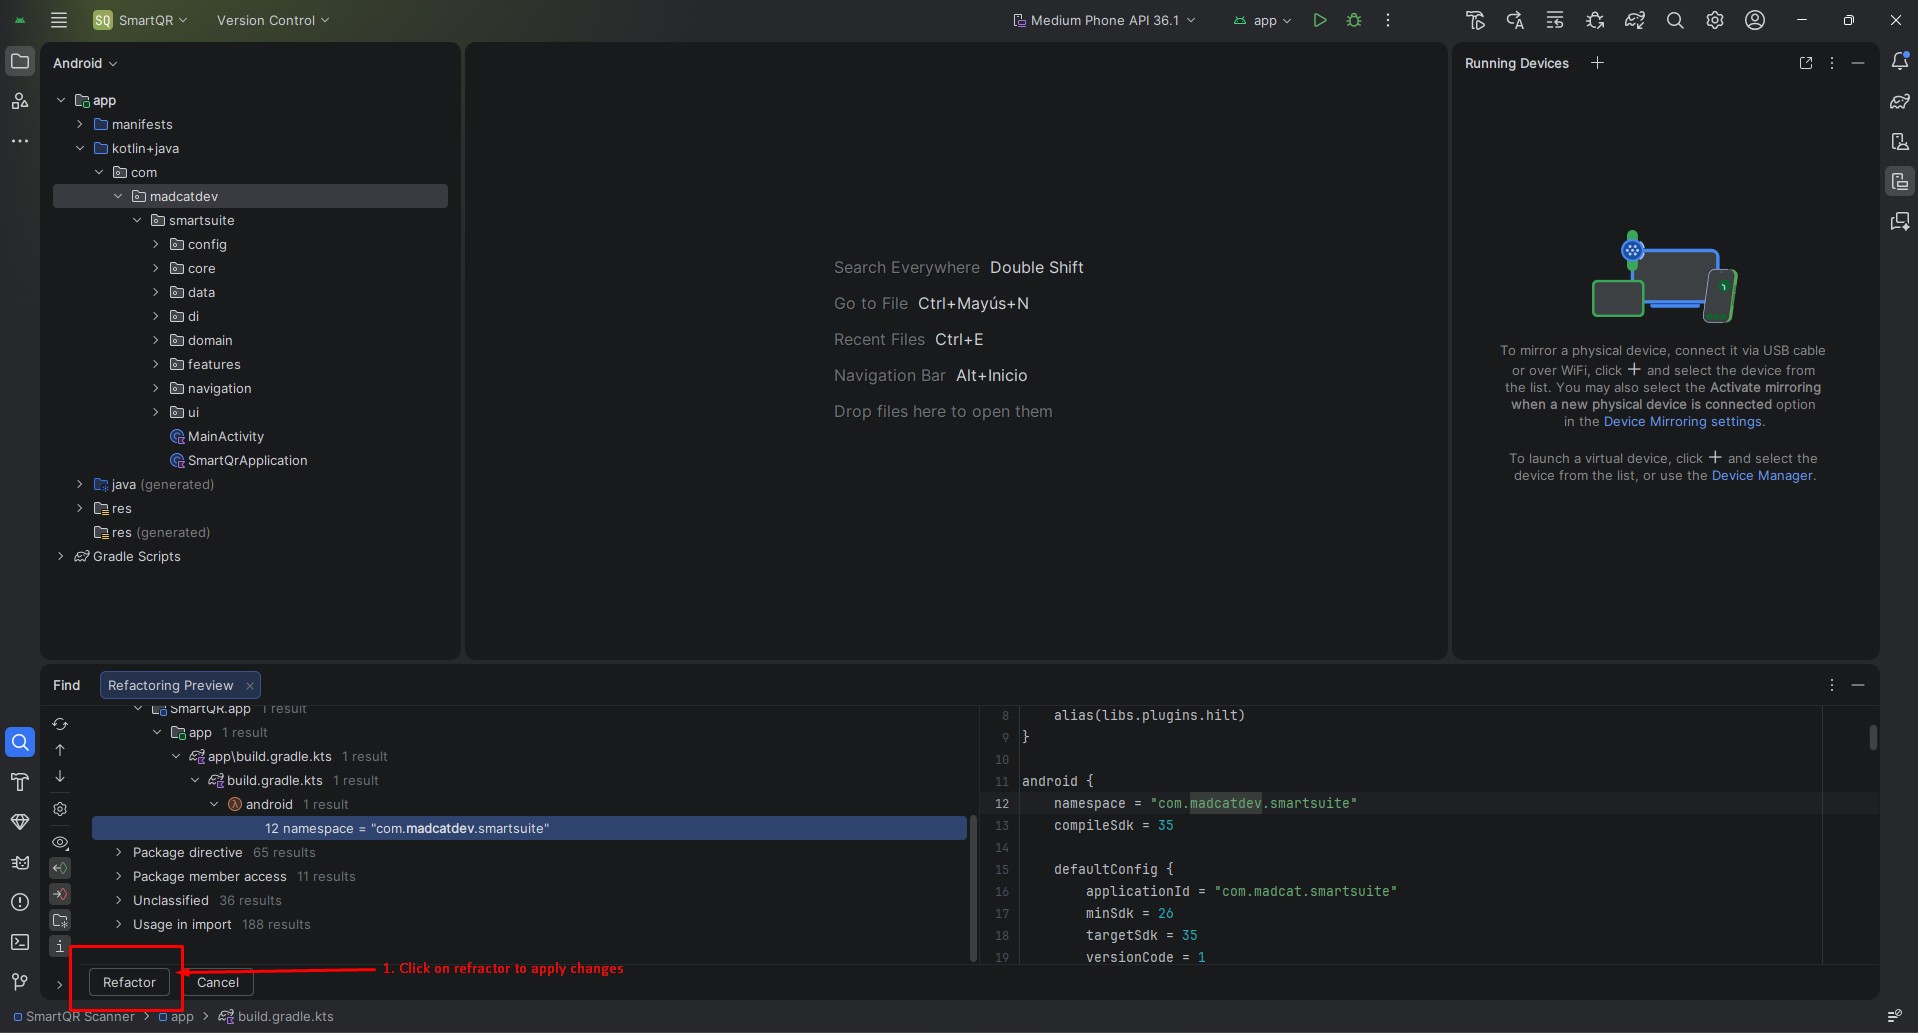
Package name step 2 reference image
2 Second step
Package name step 3 reference image
3 Third step
Package name step 4 reference image
4 Fourth step
  1. Update applicationId in app/build.gradle.kts.

Package name final check
Package name step 5 reference image
5 Fifth step
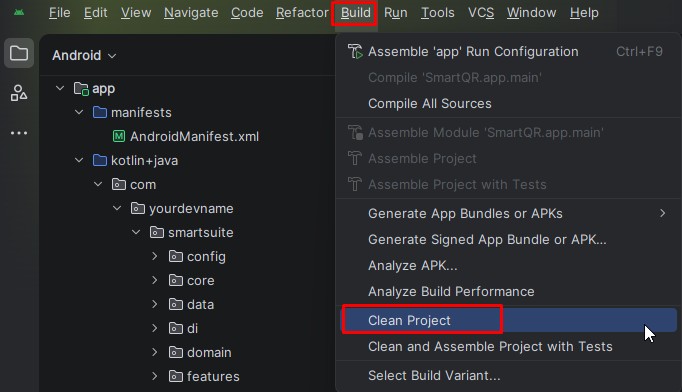
  1. Sync gradle
  2. Go to menu / build / clean project
  3. Package name step 5 reference image
    7 Seventh step
  4. Now you can build app on your device!

The FileProvider authority in the manifest uses ${applicationId}.fileprovider, so it follows the new application ID automatically.

Logo, Icon and Splash

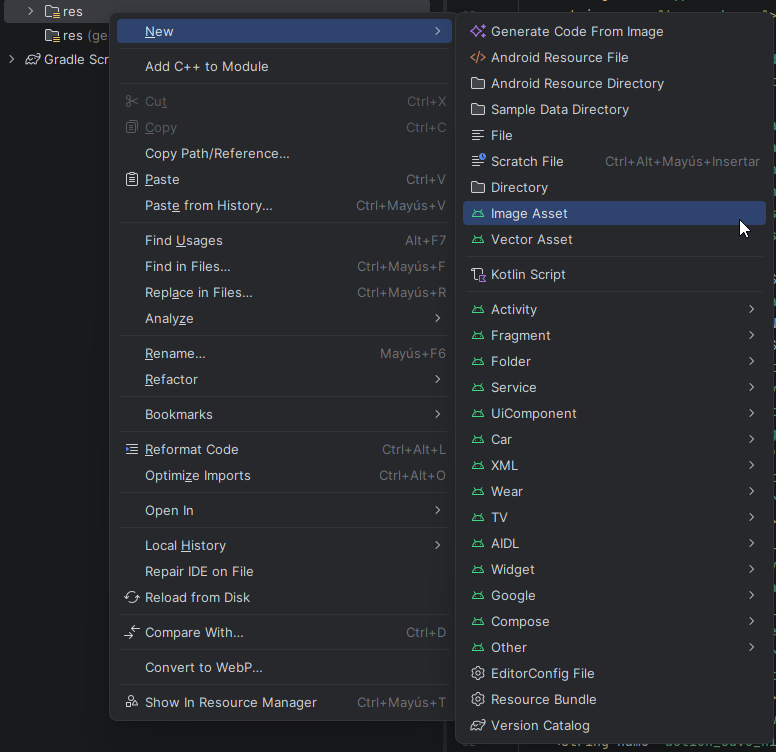
Launcher icon

Replace assets:

  1. Right click the RES folder.
  2. Click on Image Asset.
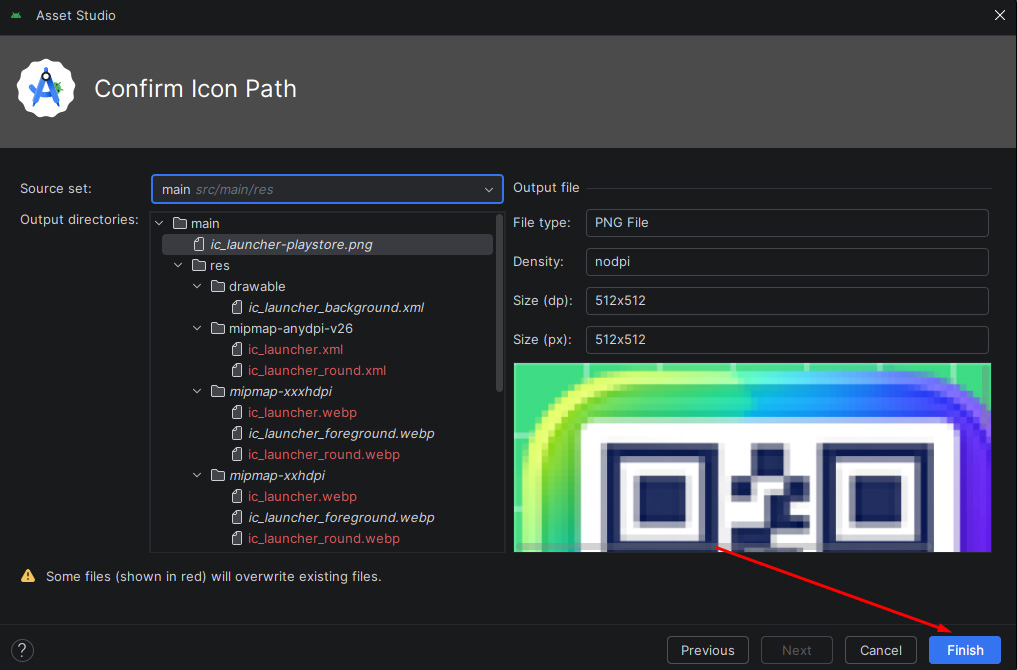
Image Asset reference
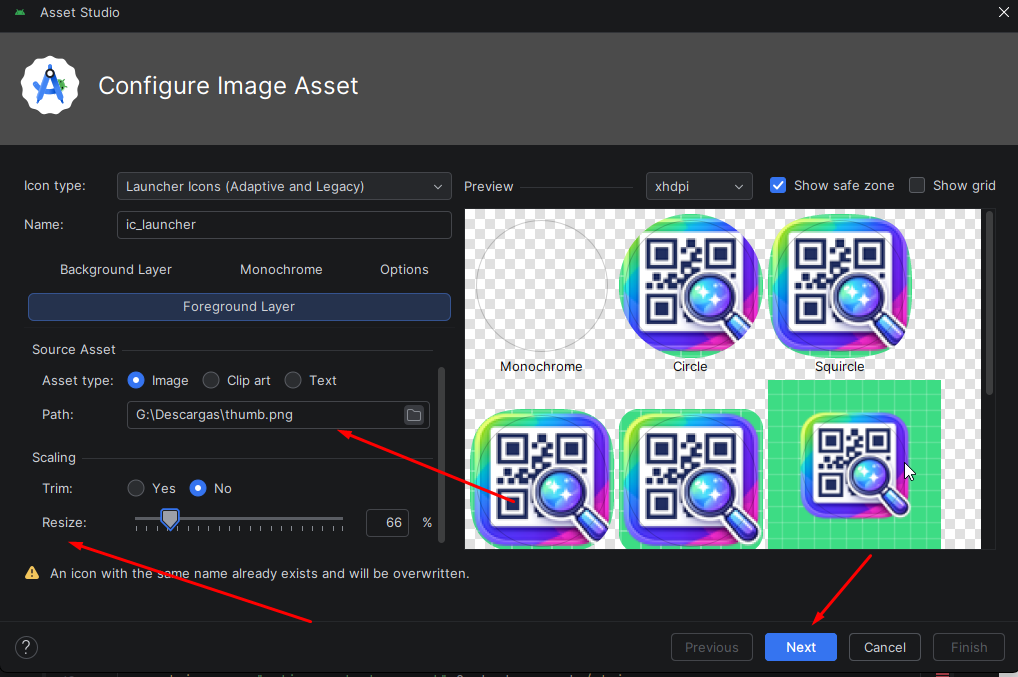
  1. Upload your icon or logo in the Path field.
  2. You can resize it before applying the changes.
  3. Click OK.
Image Asset final step reference
  1. Click Finish.
Image Asset finish reference

In-app brand mark

The app brand mark is controlled by BrandingConfig.kt and currently points to R.drawable.ic_brand_mark.

Splash

Splash appearance is controlled by SplashScreen.kt, theme colors and the brand mark resource. (Just for reference)

Colors and Theme

All core palette values are centralized in:

app/src/main/java/com/yourdevname/smartsuite(name of your app)/config/ThemeConfig.kt
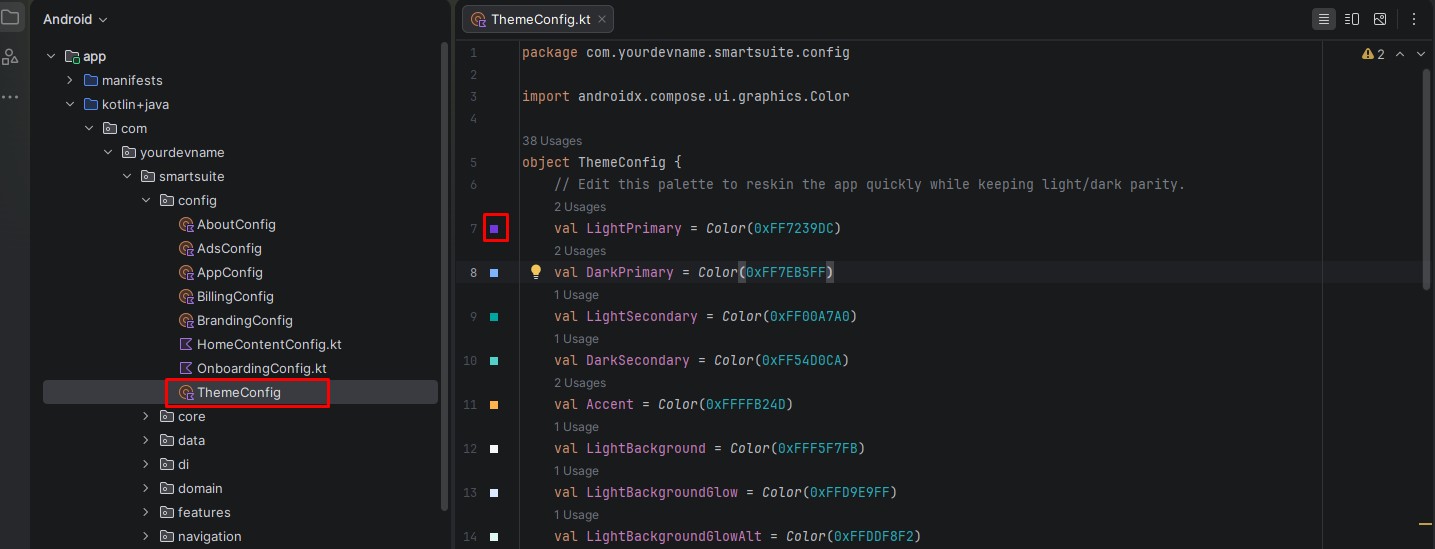
  1. Click on the color square to change colors easily.
Colors reference image

Light theme

  • LightPrimary
  • LightSecondary
  • LightBackground
  • LightSurface
  • LightTopBar

Dark theme

  • DarkPrimary
  • DarkSecondary
  • DarkBackground
  • DarkSurface
  • DarkTopBar

Texts and Informational Content

These are the main content sources:

  • app/src/main/res/values/brand_strings.xml
  • app/src/main/res/values/strings.xml
  • app/src/main/res/values/phase_strings.xml

Change the text values in these files and all files includes for every language you have. You can use default text (Branding text you should change it!)

Add Languages

  1. Create a new folder such as app/src/main/res/values-de.
  2. Add a strings.xml file for that language.
  3. Translate the keys from the base English resources.
  4. Add the language to AppLanguage.kt.
  5. Test the language switch in the app.

Current supported languages: English, Spanish, Portuguese, French and Italian.

Configure AdMob

Main files:

  • config/AdsConfig.kt - You can change with true or false where to show ads and also the number of taps
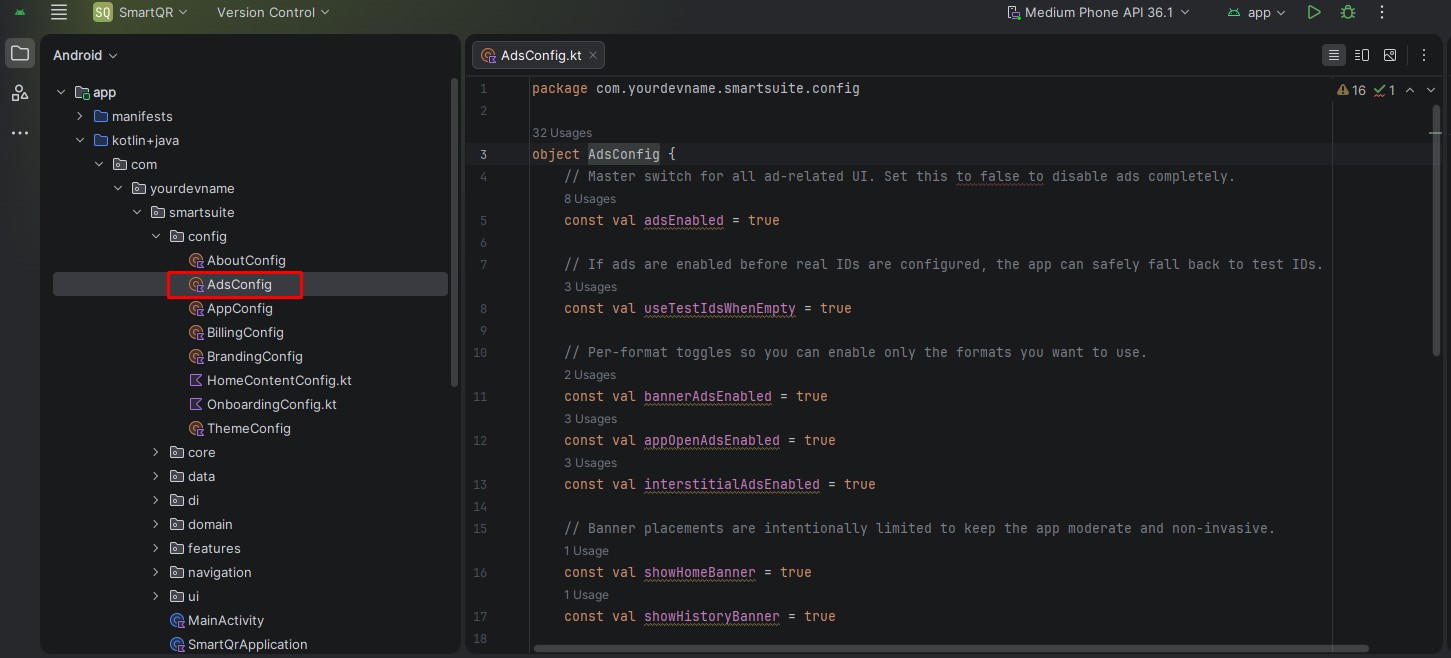
  • AdsConfig reference
    AdsConfig reference image
  • res/values/monetization_strings.xml - Here you add yor own Admob ad codes, if you don't add app will use test ads, please use them all
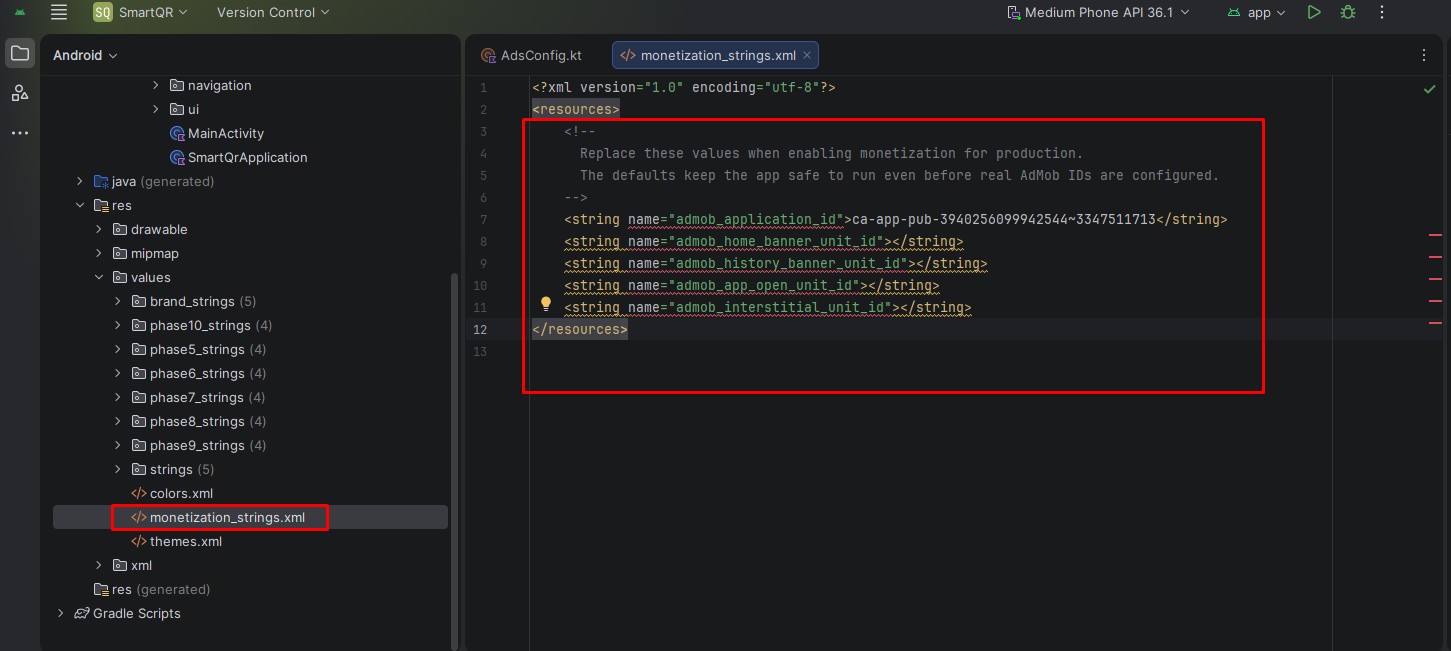
Monetization strings reference
Monetization strings reference image

Included ad types

  • Banner
  • App open
  • Interstitial after a configurable number of interactions

Main switches

  • adsEnabled
  • bannerAdsEnabled
  • appOpenAdsEnabled
  • interstitialAdsEnabled

Configure Google Play Billing Remove Ads

This project includes a single non-consumable product for permanently removing ads.
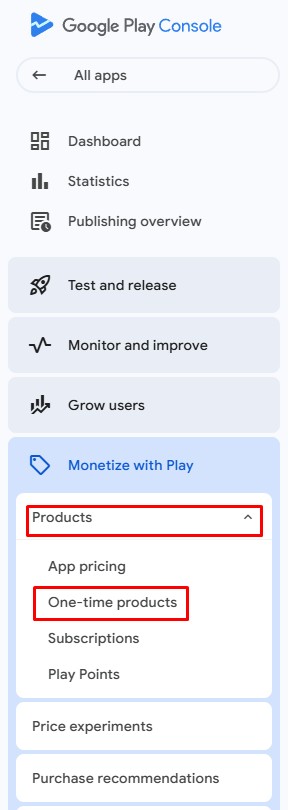
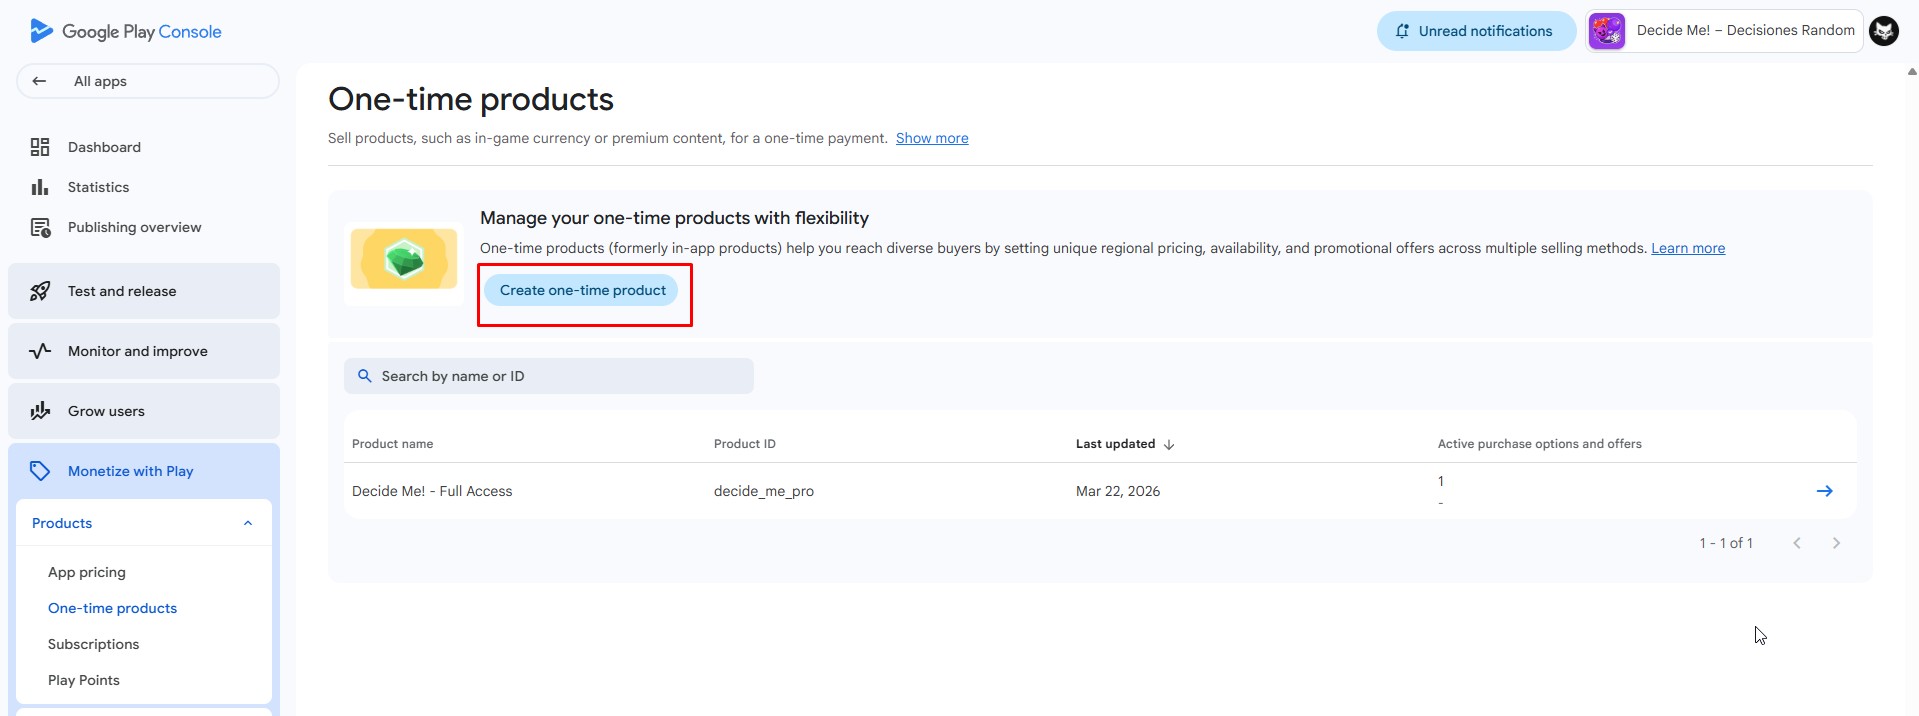
  1. Create a one-time product in Google Play Console.
Billing setup steps 1 and 2
Billing step 1 reference image
1 First step
Billing step 2 reference image
2 Second step
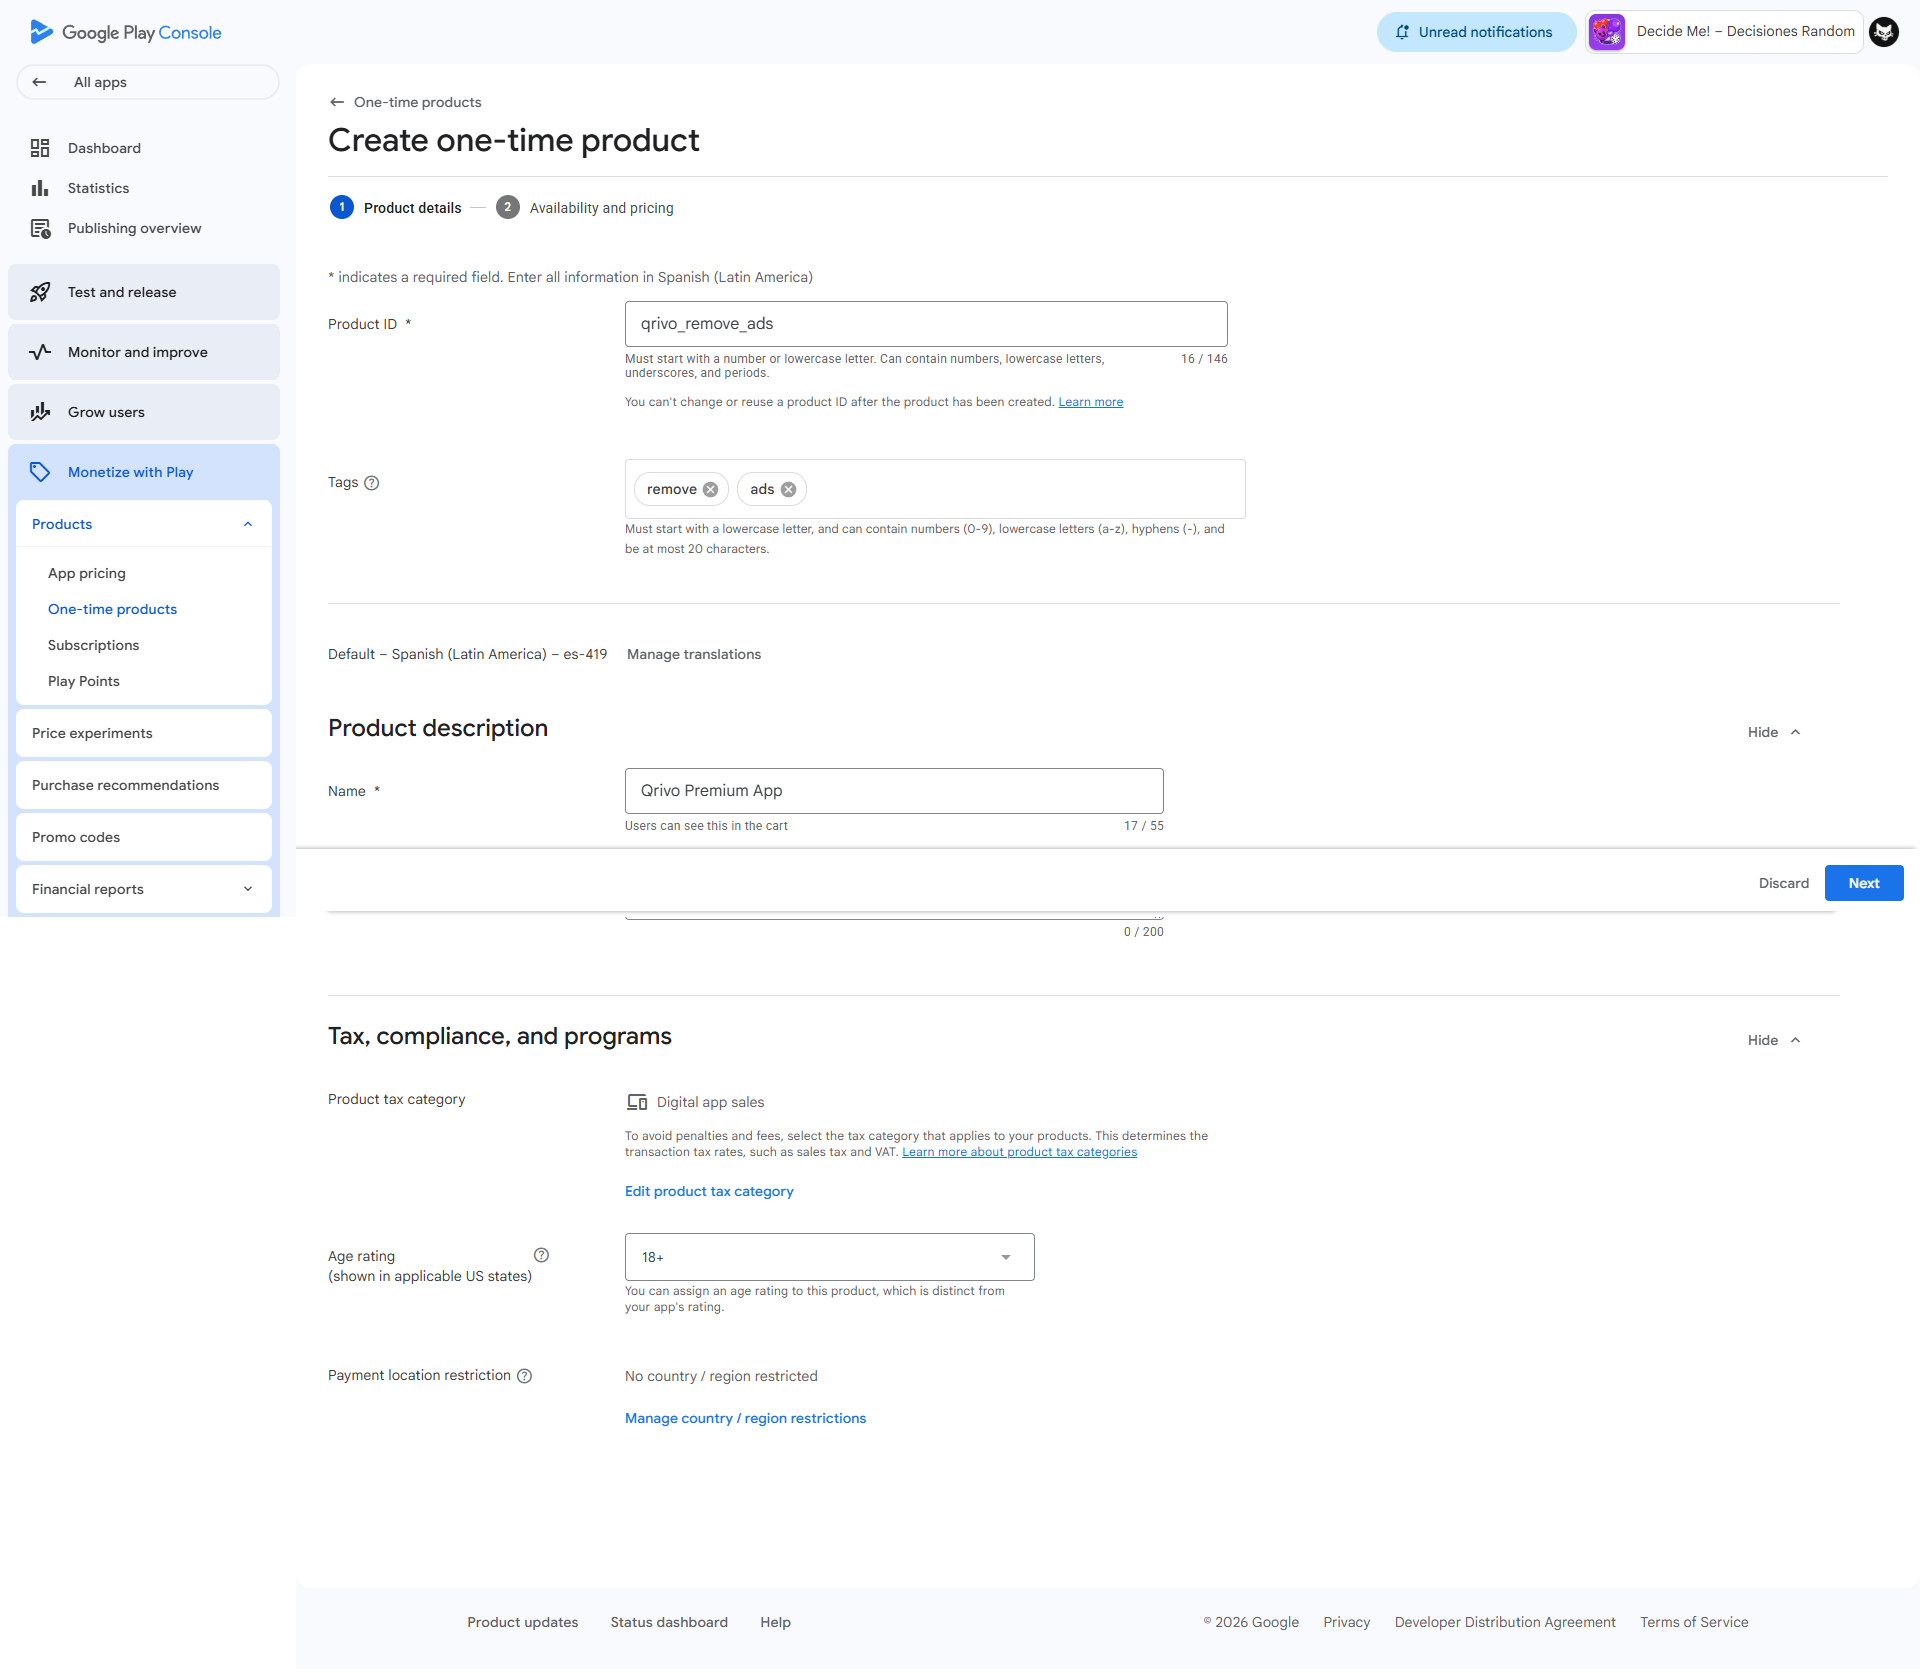
  1. Create the product ID.
Billing product ID reference
Billing product ID reference image
3 Third step
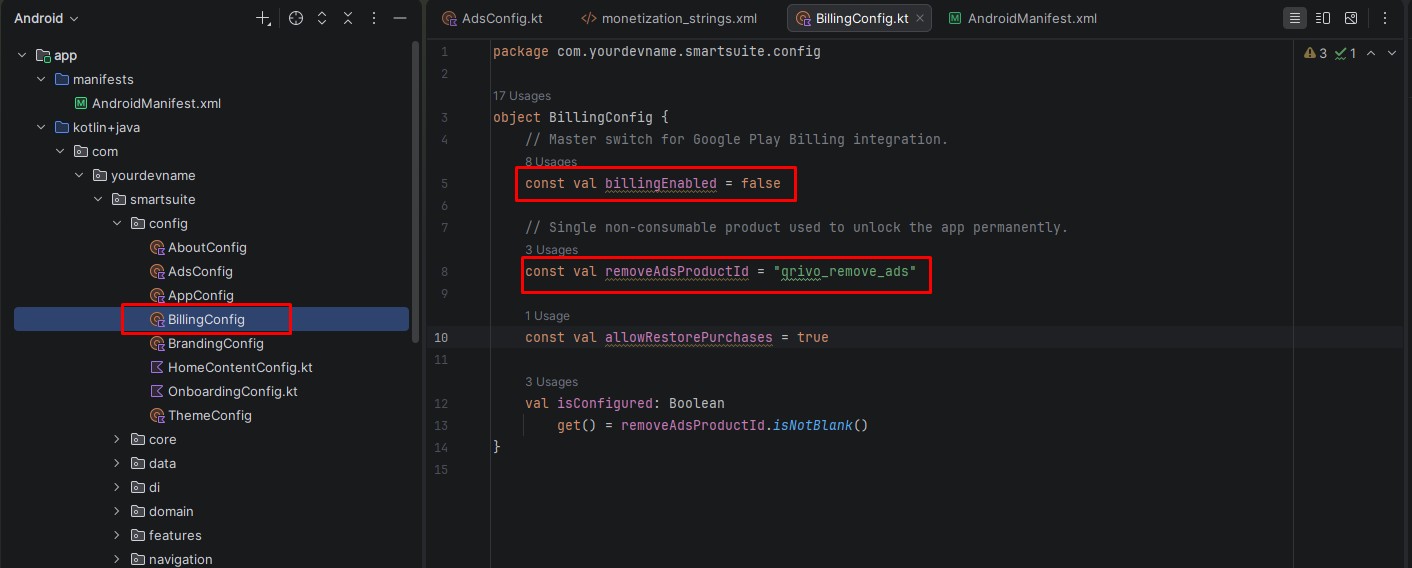
  1. Update removeAdsProductId in BillingConfig.kt.
  2. Set billingEnabled = true.
Billing config reference
Billing config reference image
5 Fifth step
  1. Test purchase and restore on a valid testing track.

Build AAB for Google Play Store

AAB output:

app/build/outputs/bundle/release/app-release.aab
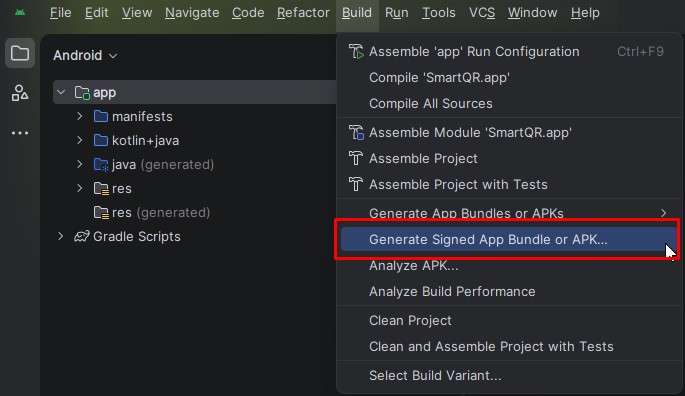
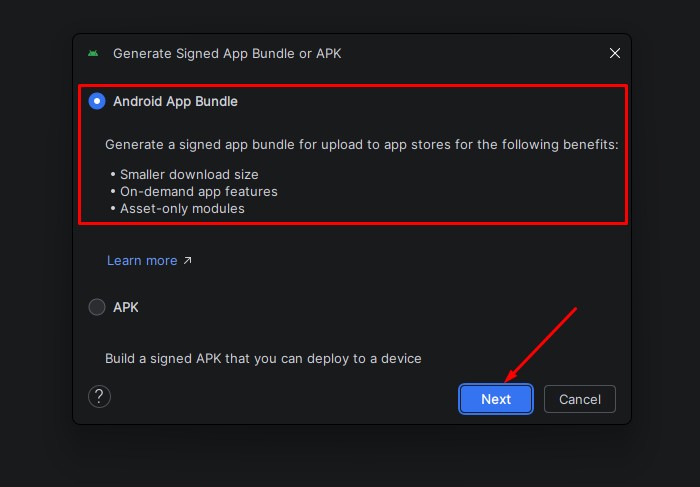
Bundle build reference sequence
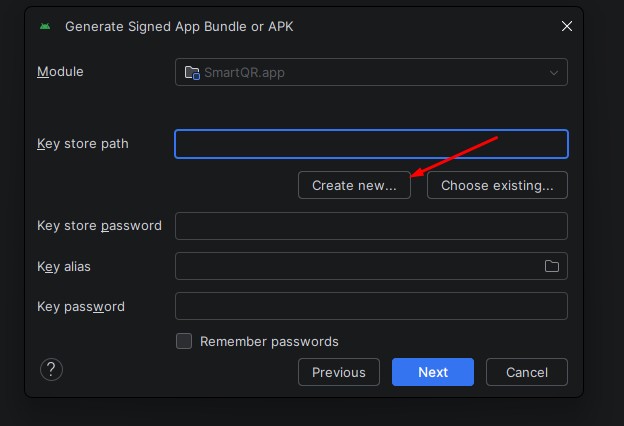
Bundle step 1 reference image
1 First step
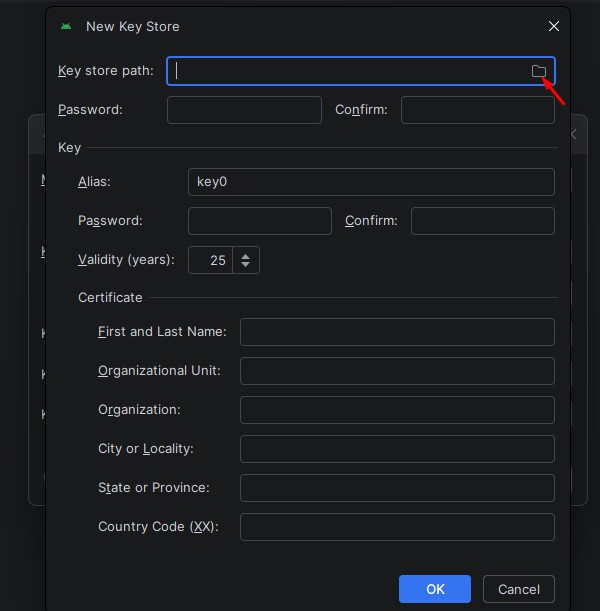
Bundle step 2 reference image
2 Second step
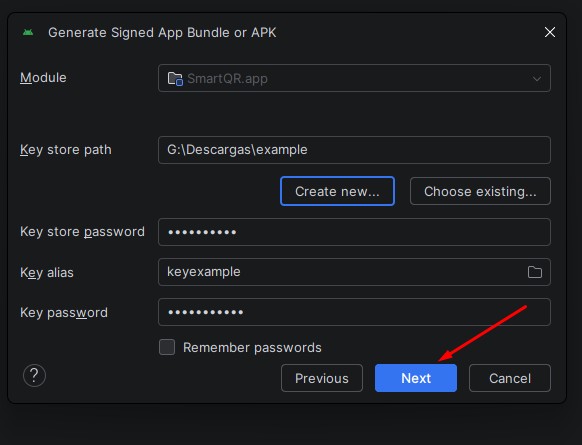
Bundle step 3 reference image
3 Third step
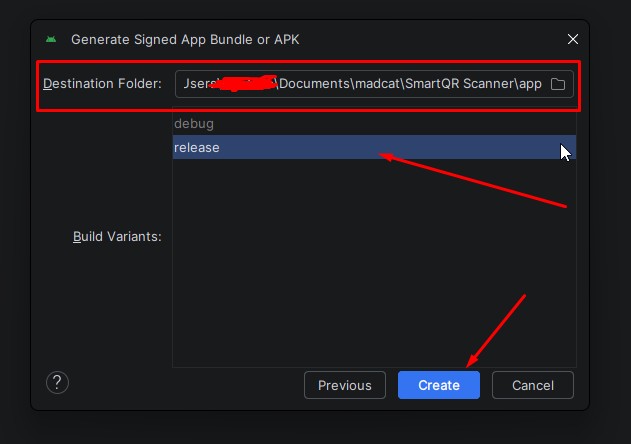
Bundle step 4 reference image
4 Fourth step
Bundle step 5 reference image
5 Fifth step
Bundle step 6 reference image
6 Sixth step
  1. Open the Android Studio build flow for a signed release and choose the App Bundle option.
  2. Select or create the keystore that will sign the release build.
  3. Confirm the key alias, passwords and output configuration shown by the wizard. (Choose a path to store the key, be aware you should have it and remember to do updates)
  4. Choose the release variant and continue through the signing flow.
  5. Finish the wizard and wait for Gradle to generate the final .aab file.
  6. Open the generated output folder and verify that the release bundle was created successfully.

Updating Safely

If you already customized Qrivo and later receive a new update, do not copy the new project over your edited project. The safest method is to keep both versions and move changes carefully from the new update into your customized app.

What you should do

  1. Keep one clean copy of the original project.
  2. Keep a separate copy of your customized project.
  3. When you receive a new update, open it in a new folder.
  4. Compare the new version with your customized version file by file.
  5. Copy only the changes you really need.
  6. Build and test the app after each important merge.

What you usually want to keep

  • Your app name and brand text
  • Your theme colors and styling
  • Your Home and onboarding content
  • Your privacy and support links
  • Your AdMob IDs and billing product ID
  • Your package name and signing setup

Files to review first

  • config/AppConfig.kt
  • config/BrandingConfig.kt
  • config/ThemeConfig.kt
  • config/HomeContentConfig.kt
  • config/OnboardingConfig.kt
  • config/AdsConfig.kt
  • config/BillingConfig.kt
  • res/values/brand_strings.xml
  • res/values/strings.xml and other language folders
Important: Never replace your customized project with a new update in one step. Compare first, move changes carefully, then build and test.

Troubleshooting

Troubleshooting reference image

Gradle sync issues

  • Use JDK 17
  • Install required Android SDK packages
  • Run gradlew.bat --stop
  • Go to menu / build / clean project

Ads not showing

  • Check AdMob app ID
  • Check ad unit IDs
  • Confirm switches in AdsConfig.kt

Billing not working

  • Enable billing in config
  • Verify product ID
  • Test from a valid internal track

Scanner issues

  • Grant camera permission
  • Check device camera availability
  • Retry after closing other camera apps

Release Checklist

Hire Our Services

If you want to save time, we can customize the app for you and leave it ready to build.

App customization service

We can handle the setup for you, customize the app, and deliver it ready for generation and release. We also include a free logo.

Special price: $75

Regular price: $120

Optional extras

  • Add one extra language: +$25
  • Custom features: price depends on the requested work

If you want everything handled for you, contact us and we will review your request.

Thank You

Support reference image

Thank you for purchasing the app. We truly appreciate your support.

If you enjoyed the product, we would be grateful if you leave a rating.

If you need help, contact us at hello@madcatdev.com.